How to Customize Columns and More in your Waiver Dashboard
WaiverFile’s admin dashboard is where you can see recently signed waivers at a glance. The dashboard is highly configurable. In this article, we’ll go over the changes you can make and the features that are available.
Customize the Sections in Your Dashboard
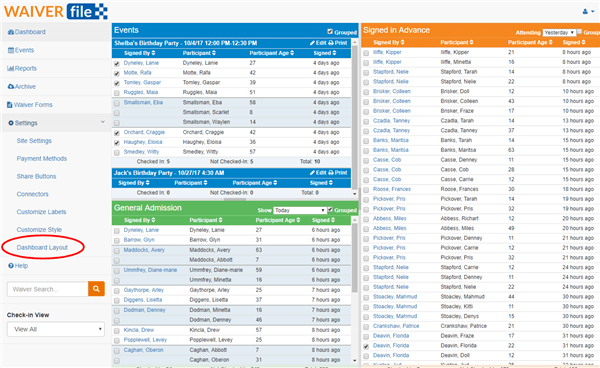
First, let’s have a look at the overall layout and general settings. From your admin dashboard, go to Settings >> Dashboard Layout.
The first choice is a list of layout options. This defined how the dashboard is broken up into sections.
The next sections show the settings for each of the three different types of waiver data that you can see.
How are the waivers organized?
Events
If a customer signs a waiver for a particular event, they will appear under the events section. This section will display a list of upcoming events, with the names of all customers who have signed appearing underneath.
Learn more about organizing events and waivers here.
Signed in Advance
When you have enabled the date-attending field on your site, customers will choose the date that they will be visiting your location. On that day, their name will appear in the signed in advance box in the dashboard.
Learn more about the Signed in Advance feature.
General Admission
(This may be relabeled if you renamed General Admission to something else)
Any additional waivers that are not listed under an event or under Signed in Advance will appear under this heading.
How can I configure the columns?
Under each section, you can click on the Choose Columns button to change what information you see for each waiver. You can select any of the standard columns as well as any of the custom fields you may have added to your form.
You can also choose if check-in boxes are included. Use these boxes to keep track of customers as they arrive.
Under the events section, you’ll see a few additional options for that. The Maximum events to load controls how many events you will see in the dashboard at once. The second option, “Keep showing events after end time” controls how long after the end time the event should remain in the dashboard. If events typically run long, or if you don’t usually enter an end time, you can add a few hours here so that the event stays on the dashboard after it has technically been listed as ended.
Once you’ve made these adjustments, click Save at the bottom of the screen.
Back on the dashboard, there are a few options on each of the boxes that you can use to adjust your view.
On the left, there is an option to choose the check-in view. You can elect to see all the waivers, just those checked in, or just those that are not checked in. This is another feature that can help when checking in large groups. If you choose to only show the not-checked-in names, each item will disappear as you check them in. You can always flip back to the complete view anytime if you need to as well.
Each of the boxes has a checkbox on the top-right called ‘Grouped’. When this is checked, the list will be grouped as they were signed. For example, if a mother walks in and signs a waiver for herself and her two children, you will see three names appear in the dashboard. If you have grouping turned on, the mother’s name will appear with the children directly below, and thicker lines separate it out so you can easily see that these names are grouped together. Depending on your workflow, this is often helpful in organizing customer names. You can easily turn it on and off if you need to sort by another column without the grouping turned on. Note that if grouping is enabled, the sorting functions so that the data is sorted by the signee’s record first, with the grouped items directly below.
The General Admission box has an option to show waivers signed today, this week, or show some of the most recent waivers. The choices here make it easier to see the relevant names of your customers.
The signed in advance box has options to see waivers signed for today, yesterday, or tomorrow, so you can select that view anytime.
